|
Walleye Central Member Boat pics Homemade Offshore inline planer board tattle flags Economical Seat Suspension System Lake Erie/ Detroit River fishing report Useful links
|
Lowrance LMS 350 NEMA interface
Here's a way to connect your LMS350A to your computer to manage your waypoints. It's a pretty basic program, but it works well. This is part of the manual showing the hookup to your computer so you can get an idea of how it works. The page didn't copy properly, but it gives you an idea of what's involved. Email me for more details if you are interested. NOTE: If you would like the software, email me. Lowrance LMS350 GPS Waypoint and Route Management
The LMS350 is an excellent sonar and GPS unit, which supports 5 channel receivers with the earlier models and 12 channel receivers in the later models. This unit however did not come with any PC based utility to manage waypoints so that operation is typically done from the LMS350 operating panel, a rather cumbersome process. While the LMS350 has the capability to download and upload waypoints, Lowrance does not sell a communications cable for this purpose. With a custom-built serial port communications cable and a very useful program however, you can upload or download your waypoints to and from your LMS350 making it much easier to manage your various waypoints and routes.
This custom cable is simple to construct and will interface to the green and white wires coming from your LMS350 power cable harness that provides the NEMA 0183 interface to your unit. You will also make a ground connection that is necessary to ensure a common reference for the two communicating devices (your PC and the LMS350).
This
is diagram identifies the required connections for the two NEMA wires and
ground.
Wire
White
Wire
GPS
Signal Wires
Add Black Wire
DB-9 Serial
Connector
5 4 3 2 1
Black - Ground to Pin 5
Connect the NEMA Interface
Wires as note here:
Green to Pin 3
Ground to Pin 5
As an option to purchasing
an extra power cable you can also make up a cable using pins that directly
plug into the LMS350 power connector. Be very careful with this approach,
and insulate the pins so you do not short pins and potentially damage the
unit.
This
is a diagram of the 12-pin power plug on the LMS 350 as viewed from the
back of the unit.
Red (+12V Power)
Orange (Speed Output)
Blue (Speed/Temp +12V
Drain (Speed/Temp Ground)
White (NEMA Output)
Black (Ground)
Yellow (Temp Output)
Blue GPS +12V )
Green (NEMA Input)
Orange (GPS Receive)
Yellow (GPS Transmit)
Drain (GPS Ground)
Connection
View on back of LMS350
Mirror
Image when looking at back of unit
LMS350/A 12
Pin Power Connector
The
factory power cable is available directly from Lowrance ($47.50 w shipping
- 12 pin 4’ cable with gray connector, model PC-13, Part number 8-72, from
LEI Accessories at
http://www.lowrance.com/accessories/). They also may be purchased
from dealers who handle Lowrance accessories. I have seen them in the $20
price range so it is a good investment, particularly if you can pick one
up for $20.
Attached is the WS-1 software needed to Upload/Download to/from the
LMS-350. The program provides the ability to identify and name up to 200
waypoints and maintain them as files on your PC. It offers you the ability
to maintain separate files for different lakes and routes and then load
the one you need for a given trip. Just open this program and save it to a
directory on your hard drvie.
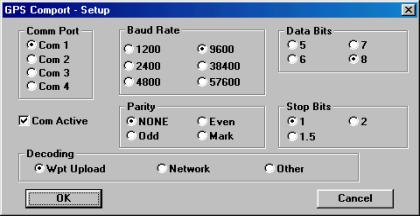
Once
you have loaded the software on your PC you need to set up the comm. port
on both the program and your PC to the required settings. From the WS-1
program select File and then COMM Port Settings. Select the settings as
noted here:
9600
baud
No
Parity
8
Data Bits
1
Stop Bit
This
is the display you will see for setting up the comm. port in the program
Also
ensure your PC has it’s COMM Port set accordingly. You get to this through
your Control Panel, System, Device Manager, Ports, Comm 1, Port Settings,
and set accordingly. It should look like this:
In
order to initialize the LMS350 to communicate with your PC, take the
following steps which will set up the LMS 350 in preparation to transfer
the waypoints.
1) With the unit turned
on, place it in GPS mode and press the Menu key 4 times to display screen
4.
2) Look for a key on the
left side of the display with no options (if there is no key without
options, press menu again to the next page). Press the key with no
options 5 times.
3) The next screen
displayed shows the operating time on the unit. The unit is now in a mode
to communicate with WS-1 program.
Your first step should be
to download any waypoints from your LMS350 so you do not accidentally over
write them.
To
do this, open the WS-1 Program and select “File” and “Open” to open a new
file.
Then
select the Download Tab and select “Download Waypoint Table From Unit”.
The
LMS350 will then transfer your waypoints into your PC. An alarm will
sound on the LMS350 when this transfer is complete, usually just a few
seconds.
Once you have edited your
waypoints you can transfer them back to the LMS350 by simply selecting the
UPLOAD tab and proceed accordingly.
This
program does not have a lot of features but you can copy and paste these
waypoints into an EXCEL spreadsheet to help sort them out. If you do
this, when pasting into EXCEL they will all be in one column. This is not
very useful in sorting the way points so go to the data tab of EXCEL and
select the “Text to Columns Option” this will then allow you to separate
the longitude, latitude and description into separate columns. Once you
sort them out however you will need to load them back into the program
manually as you can not cut and paste from EXCEL into the WS-1 Program
File.
That
is all there is to it. Although not needed for the waypoint management
connections, just for the sake of completeness the following are the
diagrams and pin functions for the other two connections on the LMS-350
power cable in case you have use for them.
GPS Connector (Female)
Drain (Ground)
Yellow (Transmit)
Orange (Receive)
Blue (+12 Volts)
Speed/Temp Connector (Female)
Drain (Ground)
Yellow (Temp Output)
Orange (Speed Output)
Blue (+12 Volts)
|